Blog Detail Page Divi Feature & Rename/Remove Projects CPT Tutorial

Blog Detail Page Divi Feature & Rename/Remove Projects CPT Tutorial

Blog Detail Page Divi Deafult Features

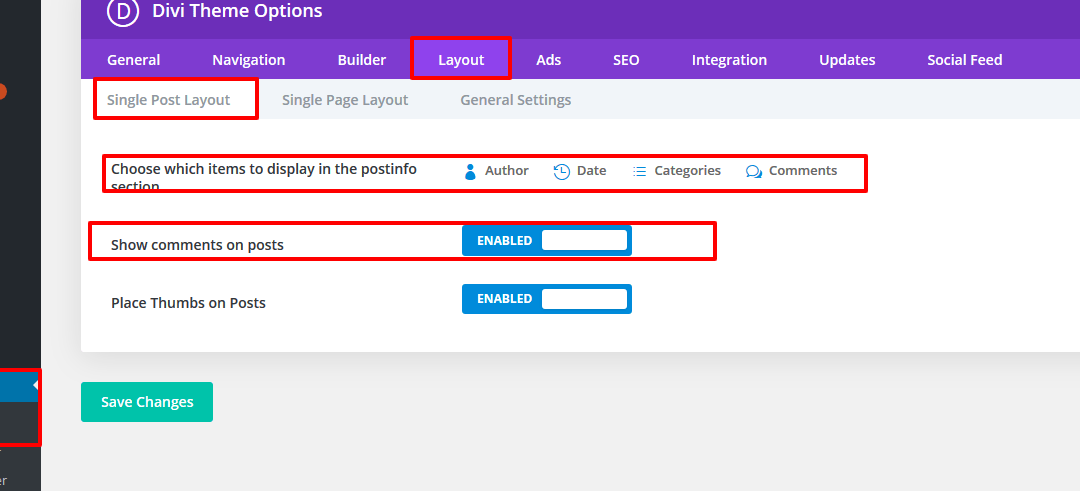
1. If you don’t want to display “Author” or “Date” or “Categories” or “Comments” On Blog detail page then Go to Divi -> Theme Options-> Layout -> Single Post Layout -> Choose which items to display in the postinfo section.

2. If you don’t want to display “Comments” section On Blog detail page then Go to Divi -> Theme Options-> Layout -> Single Post Layout -> Show comments on posts

Blog Detail Page Divi Feature & Rename/Remove Projects CPT Tutorial

3. If you want to display ad banner on post then Go to Divi -> Theme Options-> Ads

Blog Detail Page Divi Feature & Rename/Remove Projects CPT Tutorial

Blog Detail Page Divi Feature & Rename/Remove Projects CPT Tutorial

4. If you want to add HTML or tracking code on post then Go to Divi -> Theme Options-> Integration -> Code Integration.

Blog Detail Page Divi Feature & Rename/Remove Projects CPT Tutorial

Projects CPT Features

How to rename Project,Project Category & Project Tag label and frontend slug

Download code and paste on your child theme functions.php file.

Blog Detail Page Divi Feature & Rename/Remove Projects CPT Tutorial

How to Remove Project,Project Category & Project Tag

Download code and paste on your child theme functions.php file.

How to add Various Kenburns effects in divi fullwidth slider module part 2

How to add Various Kenburns effects in divi fullwidth slider module part 2

– You can use this Kenburns Effect on your divi website .

Steps for Kenburns Effect on Divi Fullwidth Slider Module

1. Download  CSS File.

2. Unzip file

3. Copy your Kenburns Effect css in kenburns.css file and paste on Divi -> Theme Options -> General -> Custom CSS

4. Below are classes which you have found in css
dp-kenburns-bottom
dp-kenburns-bottom-rev
dp-kenburns-bottom-left
dp-kenburns-bottom-left-rev
dp-kenburns-left
dp-kenburns-left-rev
dp-kenburns-top-left
dp-kenburns-top-left-rev

5.Add Full Width Section and Select Full Width Slider Module

6.Choose any one of class [ see point 4 ] & add on Advanced -> CSS Class and do others settings, see on images.

Select Advanced Tab

How to add Various Kenburns effects in divi fullwidth slider module part 2

Add Class on CSS Class Field

How to add Various Kenburns effects in divi fullwidth slider module part 2

Edit Slider Setting Icon

How to add Various Kenburns effects in divi fullwidth slider module part 2

Use Parallax Effect

How to add Various Kenburns effects in divi fullwidth slider module part 2

How to add Various Kenburns effects in divi fullwidth slider module part 2

How to add Various Kenburns effects in divi fullwidth slider module.

– You can use this Kenburns Effect on your divi website .

Steps for Kenburns Effect on Divi Fullwidth Slider Module

1. Download  CSS File.

2. Unzip file

3. Copy your Kenburns Effect css in kenburns.css file and paste on Divi -> Theme Options -> General -> Custom CSS

4. Below are classes which you have found in css
dp-kenburns-top
dp-kenburns-top-rev
dp-kenburns-top-right
dp-kenburns-top-right-rev
dp-kenburns-right
dp-kenburns-right-rev
dp-kenburns-bottom-right
dp-kenburns-bottom-right-rev

5.Add Full Width Section and Select Full Width Slider Module

6.Choose any one of class [ see point 4 ] & add on Advanced -> CSS Class and do others settings, see on images.

Select Advanced Tab

How to add Various Kenburns effects in divi fullwidth slider module.

Add Class on CSS Class Field

How to add Various Kenburns effects in divi fullwidth slider module.

Edit Slider Setting Icon

How to add Various Kenburns effects in divi fullwidth slider module.

Use Parallax Effect

How to add Various Kenburns effects in divi fullwidth slider module.

How to add slider using blurb,team,testimonial modules

How to add slider using blurb,team,testimonial modules

– You can use this slider on your divi website with child theme OR without child theme.

Steps for Blurb,Team,Testimonial Module with Slider using child theme OR without child theme

1. Download  Blurb,Team,Testimonial Module With Slider File.

2. Unzip files

3.Import Blurb,Team,Testimonial Module With Slider.json file on on Divi -> Divi Library -> Import & Export Button

How to add slider using blurb,team,testimonial modules  

4. After import layout json files you can see in below

How to add slider using blurb,team,testimonial modules

5. Click on “+” Icon see below image

How to add slider using blurb,team,testimonial modules

6. After click ,layout will be load then Publish Page

How to add slider using blurb,team,testimonial modules

7. Here two way possibility of use tilt .

1. Using Child theme
On unzip folder you can found Child Theme folder “DP Slider Layouts.zip” file so just upload and activate.

If child theme already exist then follow below step
-> Copy “js” folder and paste on your existing child theme.
-> Copy “css” folder and paste on your existing child theme.
-> Copy enqueue script function “dp_tilt_scripts” ,”divi_enqueue_assets” code and paste on your existing child theme functions.php file.
-> Copy style.css code and paste on your existing child theme style.css file.

2. Without Child theme
-> Upload “vanilla-tilt.min.js” & “owl.carousel.min.js” file on your server or anywhere and add that path on Divi-> Theme Options -> Integration Tab.
->Copy js code from init-tilt.js &init-owl.js file and paste on Divi-> Theme Options -> Integration Tab.
Just write Script tag before start code and end script tag after code finished.

See Image
How to add slider using blurb,team,testimonial modules

How to add slider using blurb,team,testimonial modules

– > Same for CSS

-> Copy style code from style.css file and paste on Divi-> Theme Options ->General -> Custom CSS .

See Image

How to add slider using blurb,team,testimonial modules


For Simple Effect use class “dp-tilt-column” on module and add class on jquery


Click here to more information about owl js

Click here to more information about tilt js

See Image

How to add slider using blurb,team,testimonial modules

How to add slider using blurb,team,testimonial modules

How to add tilt with particles js without any plugin in divi

How to add tilt with particles js without any plugin in divi

– You can use this tilt and Particles styles on your divi website.

Steps for Tilt + Particles JS Effect

1. Download  Tilt + Particles JS Effect File.

2. Unzip files

3.Import Tilt + Particles JS Effect.json file on on Divi -> Divi Library -> Import & Export Button

How to add tilt with particles js without any plugin in divi  

4. After import layout json files you can see in below

How to add tilt with particles js without any plugin in divi

5. Add New Page and Click on “Add From Library” OR “+” Icon below section

New Divi Builder
How to add tilt with particles js without any plugin in divi

Old Divi Builder

How to add tilt with particles js without any plugin in divi

7. After select layout,section then Publish Page and see on front end after done below point 8.

8. Here two way possibility of use tilt .

1. Using Child theme
On unzip folder you can found “DPDiviChild.zip” file so just upload and activate.

If child theme already exist then follow below step
-> Copy “js” folder and paste on your existing child theme.
-> Copy enqueue script function “dp_tilt_scripts” code and paste on your existing child theme functions.php file.
-> Copy style.css code and paste on your existing child theme style.css file.

2. Without Child theme
-> Upload “vanilla-tilt.min.js” & “particles.min.js” file on your server or anywhere and add that path on Divi-> Theme Options -> Integration Tab.
->Copy js code from init-tilt.js & init-particles.js file and paste on Divi-> Theme Options -> Integration Tab.
Just write Script tag before start code and end script tag after code finished.

See Image

How to add tilt with particles js without any plugin in divi

-> Copy style code from style.css file and paste on Divi-> Theme Options ->General -> Custom CSS .

See Image

How to add tilt with particles js without any plugin in divi


For Simple Effect use class “dp-tilt-column” on module and add class on jquery
For Parallax Effect use class “dp-tilt-column-parallex” on module and add class on jquery.
For Glare Effect use class “dp-tilt-column-glare” on module and add class on jquery.

For Particles Effect

Note : ID must be unique and only one time we can use ID per page.

Have created below ID’s
particles-js
particles-js-1
particles-js-2
particles-js-3
particles-js-4

Note : You can add more Particles init code base your requirement and remove extra particles init code if not use.

Click here to more information about particle js

Click here to more information about tilt js

See Image

How to add tilt with particles js without any plugin in divi

How to change default slider arrow icon on divi slider modules via CSS

How to change default slider arrow icon on divi slider modules via CSS

Change Default Slider Arrow Icon CSS for Post Slider , Slider, Full Width Slider,Full Width Post Slider Modules.

Post Slider Module

Another 5 Creative Service Designs Using Divi Module with stunning hover effects and 8 Awesome Footer Designs Using Divi Module

You can Another 5 Creative Service Designs Using Divi Module with stunning hover effects and 8 Free Awesome Footer Designs Using Divi Module

How to Create Creative Person or Team Design Using Divi Module

How to Create Creative Person or Team Design Using Divi Module

5 Free Style of Person or Team Designs.

How to Create Creative Service Designs Using Divi Module

You can Create Creative Service Designs using divi module. 5 Free Style of Service Designs.

Slider Module

Your Title Goes Here

Your content goes here. Edit or remove this text inline or in the module Content settings.

Your Title Goes Here

Your content goes here. Edit or remove this text inline or in the module Content settings.

Post Slider Code:
1. Add Class on post slider module "dp_tut_post_slider_arrow".
2. Add below CSS code on Theme option OR Child Theme CSS.
.et_pb_slider.dp_tut_post_slider_arrow .et-pb-arrow-prev {opacity: 1;left: 22px;}
.et_pb_slider.dp_tut_post_slider_arrow .et-pb-arrow-next {opacity: 1;right: 22px;}
.et_pb_slider.dp_tut_post_slider_arrow .et-pb-arrow-prev:before{content:"";}
.et_pb_slider.dp_tut_post_slider_arrow .et-pb-arrow-next:before{content:"";}
Slider Code:
1. Add Class on  slider module "dp_tut_slider_arrow".
2. Add below CSS code on Theme option OR Child Theme CSS.
.et_pb_slider.dp_tut_slider_arrow .et-pb-arrow-prev {opacity: 1;left: 22px;}
.et_pb_slider.dp_tut_slider_arrow .et-pb-arrow-next {opacity: 1;right: 22px;}
.et_pb_slider.dp_tut_slider_arrow .et-pb-arrow-prev:before{content:"";}
.et_pb_slider.dp_tut_slider_arrow .et-pb-arrow-next:before{content:"";}

FullWidthPost Slider

Another 5 Creative Service Designs Using Divi Module with stunning hover effects and 8 Awesome Footer Designs Using Divi Module

Another 5 Creative Service Designs Using Divi Module with stunning hover effects and 8 Awesome Footer Designs Using Divi Module

You can Another 5 Creative Service Designs Using Divi Module with stunning hover effects and 8 Free Awesome Footer Designs Using Divi Module

How to Create Creative Person or Team Design Using Divi Module

How to Create Creative Person or Team Design Using Divi Module

How to Create Creative Person or Team Design Using Divi Module

5 Free Style of Person or Team Designs.

Services

How to Create Creative Service Designs Using Divi Module

You can Create Creative Service Designs using divi module. 5 Free Style of Service Designs.

FullWidthPost Slider Code:
1. Add Class on FullWidthPost Slider module "dp_tut_fw_post_slider_arrow".
2. Add below CSS code on Theme option OR Child Theme CSS.
.et_pb_slider.dp_tut_fw_post_slider_arrow .et-pb-arrow-prev {opacity: 1;left: 22px;}
.et_pb_slider.dp_tut_fw_post_slider_arrow .et-pb-arrow-next {opacity: 1;right: 22px;}
.et_pb_slider.dp_tut_fw_post_slider_arrow .et-pb-arrow-prev:before{content:"c";}
.et_pb_slider.dp_tut_fw_post_slider_arrow .et-pb-arrow-next:before{content:"d";}

FullWidth Slider

Your Title Goes Here

Your content goes here. Edit or remove this text inline or in the module Content settings. .

Your Title Goes Here

Your content goes here. Edit or remove this text inline or in the module Content settings.

FullWidth Slider Code:
1. Add Class on FullWidth Slider  module "dp_tut_fw_slider_arrow".
2. Add below CSS code on Theme option OR Child Theme CSS.
.et_pb_slider.dp_tut_fw_slider_arrow .et-pb-arrow-prev {opacity: 1;left: 22px;}
.et_pb_slider.dp_tut_fw_slider_arrow .et-pb-arrow-next {opacity: 1;right: 22px;}
.et_pb_slider.dp_tut_fw_slider_arrow .et-pb-arrow-prev:before{content:"";}
.et_pb_slider.dp_tut_fw_slider_arrow .et-pb-arrow-next:before{content:"";}

Divi Icon Codes

——————————————————–
Blog Detail Page Divi Feature & Rename/Remove Projects CPT Tutorial

CSS : 
content:""; (left icon)
content:""; (right icon)

——————————————————–
Blog Detail Page Divi Feature & Rename/Remove Projects CPT Tutorial

CSS :
content:""; (left icon)
content:""; (right icon)

——————————————————–
Blog Detail Page Divi Feature & Rename/Remove Projects CPT Tutorial

CSS : 
content:"c"; (left icon)
content:"d"; (right icon)

——————————————————–
Blog Detail Page Divi Feature & Rename/Remove Projects CPT Tutorial

CSS : 
content:""; (left icon)
content:""; (right icon)

——————————————————–
Blog Detail Page Divi Feature & Rename/Remove Projects CPT Tutorial

CSS : 
content:""; (left icon)
content:""; (right icon)

——————————————————–
Blog Detail Page Divi Feature & Rename/Remove Projects CPT Tutorial

CSS : 
content:""; (left icon)
content:""; (right icon)

——————————————————–

——————————————————–
Blog Detail Page Divi Feature & Rename/Remove Projects CPT Tutorial

CSS : 
content:"\e03b"; (left icon)
content:"\e03c"; (right icon)

——————————————————–
Blog Detail Page Divi Feature & Rename/Remove Projects CPT Tutorial

CSS :
content:"\e045"; (left icon)
content:"\e046"; (right icon)

——————————————————–
Blog Detail Page Divi Feature & Rename/Remove Projects CPT Tutorial

CSS : 
content:"\e049"; (left icon)
content:"\e04a"; (right icon)

——————————————————–
Blog Detail Page Divi Feature & Rename/Remove Projects CPT Tutorial

CSS : 
content:"\e04d"; (left icon)
content:"\e04e"; (right icon)

——————————————————–

Blog Detail Page Divi Feature & Rename/Remove Projects CPT Tutorial